Ok so seriously who can do any quilting project without batting? I love to make small quilts and lots of them. I probably pull out my batting twice or three times a week. I wait to buy batting until I have a 40% coupon at JoAnn's and then I buy a King size quilt roll. It goes a lot farther and you get more for the money you are spending (since I am spending it anyways.) I personally use Warm and Neutral, or anything that is a little thicker. I like the feel of it. It doesn't tear easily at all...and well, I just like it better then the other battings I have used before.
I always keep it in the bag so that when I get to scraps I have a bag to keep it in. At any given time I might have two bags of scraps and a larger pieces bag. I throw away very little batting. If you have tons of smaller scraps, whip up a small holiday rag quilt.
Truly I have nothing more to say about this. If you are going to quilt you have to have it on hand at all times to finish projects. Don't be like me and wait until you have like ten UFO quilt tops before going and buying it. As soon as you have a top done, make the backing, baste the batting in and get it ready to finish. Nothing is better than finishing a project. If a quilt top is already ready to quilt, I usually find time to get it quilted faster and enjoy putting out a finished product as decoration.
Hope that you enjoyed.
Showing posts with label tools. Show all posts
Showing posts with label tools. Show all posts
Friday, November 14, 2014
Monday, November 10, 2014
Can't Live without it- part 14
Most of my posts of things I can't live without, I have tried to find the cheapest and best price for the product available. Well, this is probably my most expensive item that I constantly buy. However, it is the best basting spray that I have used and I would not be able to machine quilt on my own domestic machine without it.
This is called 505. You simply spray it between the layers (the top, batting and the backing) and truly even on my really large heavy Levi quilt none of the layers even shifted. The stickiness lasts forever. I have basted quilts before and come back to a month or even a year later and the layers are still completely in place and don't shift. On my larger quilts I do pin them with safety pins just in case. They used to sell really small bottles that wouldn't last that long, but now they are selling 00 ounce bottles. It is usually around $22-$25 a bottle depending on where you buy it. They now sell the small bottle in JoAnn's stores. Walmart also has it on their online store. (If you are looking for an online place I would suggest Walmart site-to-store. Free shipping and the same price you would buy it at a regular store.) I am really glad that both my LQS are selling it now in their stores so I can run and grab some when i run out. This bottle has lasted me at least 10 wall hangings and two quilts and is about 2/3 gone. That is pretty good.

Hope that you enjoyed.
This is called 505. You simply spray it between the layers (the top, batting and the backing) and truly even on my really large heavy Levi quilt none of the layers even shifted. The stickiness lasts forever. I have basted quilts before and come back to a month or even a year later and the layers are still completely in place and don't shift. On my larger quilts I do pin them with safety pins just in case. They used to sell really small bottles that wouldn't last that long, but now they are selling 00 ounce bottles. It is usually around $22-$25 a bottle depending on where you buy it. They now sell the small bottle in JoAnn's stores. Walmart also has it on their online store. (If you are looking for an online place I would suggest Walmart site-to-store. Free shipping and the same price you would buy it at a regular store.) I am really glad that both my LQS are selling it now in their stores so I can run and grab some when i run out. This bottle has lasted me at least 10 wall hangings and two quilts and is about 2/3 gone. That is pretty good.
Hope that you enjoyed.
Can't Live without it- part 13
One day I was at my aunt's house. She uses her kitchen table for sewing...an excellent place to sew. She was cleaning up after a big project. She went and grabbed a broom, dust pan and her kitchen garbage. We were talking about that. She had all the scraps from sewing all over the floor. She said that she doesn't clean it all up until the end because she just has to do it too many times. I suggested that she get a garbage can for just sewing and put it next to her. It drives me nuts literally when I don't have a garbage can when I am sewing. I can't handle the cut threads on the table next to me, or getting on my sewing foot if I have to throw them on the ground.
That is when I realized that this is one of those things on my list of "I can't live without it." This is mine. My daughter used to empty this all the time when she was 15 months and so does my son who is now 2yrs old. I have been using it as a great teaching opportunity for my kids on learning how to put things away. Trying to use small moments like this as learning moments rather than getting upset. Yep, patience is a virtue that sometimes has to be learned over and over again over time.
Hope that you enjoyed.
Tuesday, August 9, 2011
Can't live without it- part 12
Since starting to sew, each time that I have moved I have realized more and more how much I need one of these. A broom. yes, a broom.
Right now my sewing area is the kitchen table right in the middle of the walkway from our only outside door. Whenever i have to put my projects on the floor to add edges, place pieces in the right place, baste batting and backings to my projects I have to sweep first. Every night after finishing sewing I have to sweep. When I have had sewing rooms where I had carpet on the floor, I have always put down a computer mat for my chair and have had to clean that up. I know that if I was in a carpeted area I probably would have taken a picture of my vacuum. Cleaning up is an inevitable part of sewing and therefore I have to put it on my list of things I can't live without.
Hope that you enjoyed.
Thursday, August 4, 2011
Can't live without it- Part 11
OK, so I know that it has been at least a week. But, here I am again. I know that this is the most random sewing tool ever! However, I can't possibly work in my sewing area without it. A lint brush.
 I clean projects, my mat, my chair, my clothes, my ironing board, my shelves..etc etc with it. I was reading a forum the other day on Quilter's Club of America about the different things that various people use. They had some great ideas that is for certain. I love this brush because you can clean it easily by pulling off a layer at a time. They have replacement ends which is great. They come in various sizes so you can travel with one or just have one sitting in your craft area.
Hope that you enjoyed.
Friday, July 29, 2011
Can't Live Without it- part 10
Today I am surprised to find that I am posting about something that I already posted about...again. However, it is the newest addition to my house and seriously I have missed having one of these for a while.
YEP, here is my new ironing board. I love it. I bought one that was a little wider this time. I love that it is almost the same height as the counter so that I can actually push it onto the counter as I sew. So, cool. yep, i know that this is probably so far from everyone else's excitement in life. However, for me to be able to iron a whole section in on sweep and not have to bend over on my table top one and then only get to do one side then adjust to the other side...etc. is wonderful!!!
 That's all for today. Hope that you enjoyed.
Saturday, July 9, 2011
Can't live without it- part 7
So, at this point I have now posted a weeks worth of posts in my Can't live without it series. I know that to some of you it may seem like the things that I am posting are pretty random. I mean, why am I not posting pictures of things like my sewing machine and basic things like that. I actually will be getting a post like that later this week. Every day when I decide what I want to write about it is the thing that I am the most grateful for that day. Most of the things that I am posting are things that save me time while I am trying to find those few spare moments to sew and craft.
If you haven't noticed by now, I am an obsessed crafter. I wrote down the list of projects that I want to finish in August while I am not working one of my jobs. The list was full of over 50 things I want to get done. Yikes! I think, well how am I going to be a mom, a wife, housekeeper, good employee and employer and still manage everything that I want to do on the side. It is because I have a lists of things that help me do what I want in either a short amount of time or quicker than I would have got it done without it.
Today's post is on: my thread.
Thread is probably the most basic part of sewing. For me for quick and on-the-go sewing it is a necessity to have a small stash. While I was sewing blanket for the farmers market two summers ago I decided that I would invest in buying a large quantity of colors so that I could match all the colors of fabric I was sewing on. At first I would buy the small spools of colored thread at JoAnn's. However, those small spools cost about $1.50 for 125 yards. I would go through my thread so fast. Then I decided to buy the white serger spools for $1.99 for my bobbin thread. That was nice. I didn't go through white thread nearly as fast.
But then the problem came...I bought about 5 spools of white thread one day and with every spool of thread it started unraveling as I would sew and break. I thought maybe my tension was off and I adjusted that. Then I though something was wrong with my bobbin casing, but nothing was wrong. After three spools of thread...I had had it!! I was re-threading my thread on my machine almost every five minutes as it would break. If it had been one spool that would have been ok I think. But three spools was rediculous. I know that I probably got a bad batch of thread, but I was determined to find something else that fit my needs better.
That was when I got my connecting threads catalogue. I knew that I had seen thread in there before so I thought I would check out the price and shipping to see if it was worth it to have it shipped and still not cost me more than going somewhere in person. Well, i was totally in luck. They were having a 30% off sale (which they are having right now too by the way). Each spool was around $1.80 and there were 1200 yards of thread on a spool not just 125 yards. Just by the shear amount of thread that I was going to get per spool I knew that it would be worth it. I read some reviews online and decided that I would just take a stab at it, invest in the thread and get what I wanted. I ordered each of their color sets and a set of 5 white spools. (Around 50 spools). Totally worth it. Two years later I still have not bought any thread. I have almost finish the white spools, but seriously with the amount of sewing I was going before I would go through a spool almost every week. Now with my white spools I go through like one every other month.
The best part of connecting threads is if you order $50 worth it is free shipping. So, you are paying slightly more than a spool at your local fabric store, for almost 9 1/2% more thread and not paying shipping if you are ordering in a larger quantity. All of the cotton is grown in the USA too for the thread. So, you are supporting American farmers (if you live in the USA and care too know about that). ya, I was hooked.
The biggest problem with my thread has been: figuring out how to store it.
 Then on this rack on my table (which then moved to the dresser, the couch the floor and simply all over). Eventually when I own my own home with a permanent craft area I am going to use this again for my most common threads to have close easy access. I bought this at JoAnn's with a 50% off coupon so I couldn't tell you how much a spent on it at the time.
 Then I put it all in a drawer in this storage container.
 Then I put it all in my tool box because I needed it on the go.
Then I finally recently invested in this container my by ArtBin. While I can't use every spot in the container because the spools are too large I finally have a container of good quality with great clips to keep it closed. I love it. I can take it on the go and it is really so nice. I like that it is clear too so I can see each of the colors inside without having to open the lid.
 Here is Madalynn the day that I got it, sitting on it. She thought it was her new seat and loved it of course :)
 So in short, I really can't tell you enough how much I can't live without my thread. I know that I can start any project at anytime of the day or night and I have what I need to finish the project without having to run to the store. I joined Quilter's Club of America a couple years ago and in the forums several ladies have asked other quilters what thread they use. Most have said that they have switched to this thread and have never had any problems with it and they love it. I will say that i do have other kinds of thread like: invisible thread and elastic thread and such, but for basic sewing, piecing a quilting I used this.
Hope that you enjoyed.
If you haven't noticed by now, I am an obsessed crafter. I wrote down the list of projects that I want to finish in August while I am not working one of my jobs. The list was full of over 50 things I want to get done. Yikes! I think, well how am I going to be a mom, a wife, housekeeper, good employee and employer and still manage everything that I want to do on the side. It is because I have a lists of things that help me do what I want in either a short amount of time or quicker than I would have got it done without it.
Today's post is on: my thread.
Thread is probably the most basic part of sewing. For me for quick and on-the-go sewing it is a necessity to have a small stash. While I was sewing blanket for the farmers market two summers ago I decided that I would invest in buying a large quantity of colors so that I could match all the colors of fabric I was sewing on. At first I would buy the small spools of colored thread at JoAnn's. However, those small spools cost about $1.50 for 125 yards. I would go through my thread so fast. Then I decided to buy the white serger spools for $1.99 for my bobbin thread. That was nice. I didn't go through white thread nearly as fast.
But then the problem came...I bought about 5 spools of white thread one day and with every spool of thread it started unraveling as I would sew and break. I thought maybe my tension was off and I adjusted that. Then I though something was wrong with my bobbin casing, but nothing was wrong. After three spools of thread...I had had it!! I was re-threading my thread on my machine almost every five minutes as it would break. If it had been one spool that would have been ok I think. But three spools was rediculous. I know that I probably got a bad batch of thread, but I was determined to find something else that fit my needs better.
That was when I got my connecting threads catalogue. I knew that I had seen thread in there before so I thought I would check out the price and shipping to see if it was worth it to have it shipped and still not cost me more than going somewhere in person. Well, i was totally in luck. They were having a 30% off sale (which they are having right now too by the way). Each spool was around $1.80 and there were 1200 yards of thread on a spool not just 125 yards. Just by the shear amount of thread that I was going to get per spool I knew that it would be worth it. I read some reviews online and decided that I would just take a stab at it, invest in the thread and get what I wanted. I ordered each of their color sets and a set of 5 white spools. (Around 50 spools). Totally worth it. Two years later I still have not bought any thread. I have almost finish the white spools, but seriously with the amount of sewing I was going before I would go through a spool almost every week. Now with my white spools I go through like one every other month.
The best part of connecting threads is if you order $50 worth it is free shipping. So, you are paying slightly more than a spool at your local fabric store, for almost 9 1/2% more thread and not paying shipping if you are ordering in a larger quantity. All of the cotton is grown in the USA too for the thread. So, you are supporting American farmers (if you live in the USA and care too know about that). ya, I was hooked.
The biggest problem with my thread has been: figuring out how to store it.
Originally I stored it in the box it came in.
 Then on this rack on my table (which then moved to the dresser, the couch the floor and simply all over). Eventually when I own my own home with a permanent craft area I am going to use this again for my most common threads to have close easy access. I bought this at JoAnn's with a 50% off coupon so I couldn't tell you how much a spent on it at the time.
 Then I put it all in a drawer in this storage container.
 Then I put it all in my tool box because I needed it on the go.
Then I finally recently invested in this container my by ArtBin. While I can't use every spot in the container because the spools are too large I finally have a container of good quality with great clips to keep it closed. I love it. I can take it on the go and it is really so nice. I like that it is clear too so I can see each of the colors inside without having to open the lid.
 Here is Madalynn the day that I got it, sitting on it. She thought it was her new seat and loved it of course :)
 So in short, I really can't tell you enough how much I can't live without my thread. I know that I can start any project at anytime of the day or night and I have what I need to finish the project without having to run to the store. I joined Quilter's Club of America a couple years ago and in the forums several ladies have asked other quilters what thread they use. Most have said that they have switched to this thread and have never had any problems with it and they love it. I will say that i do have other kinds of thread like: invisible thread and elastic thread and such, but for basic sewing, piecing a quilting I used this.
Hope that you enjoyed.
Friday, July 8, 2011
Can't live without it- part 6
Organization is key to my crafting obsession. While I may not be "organized" in the sense of everything put in order, clean or even having a craft space in one area of my house, I know where everything is. One of the hardest parts about organization is the fact that we have moved 4 times this last year and a half. I will be forever grateful to my best-friend Abby who came by my house the first time I moved and helped me pack up my fabric. Much to Russ's irritation I went and bought some moving boxes for my craft stuff. We had plenty of boxes, but I told him that I wanted all my fabric in matching boxes that were different from everything else so they were easy to separate. Abby folded each and every piece of fabric to fit in the boxes and then we labeled them. I still know where everything is because we labeled each box so specifically.
Over time I have bought clear boxes to put everything in. It just makes it easier to find things. Right now I have craft stuff in my daughter's closet, the coat closet, the kitchen, on our storage racks in the kitchen, in a filing cabinet, piled on the filing cabinet, on top of the deep freezer (that is my ironing board), stashed in a corner behind our deep freezer, on my old ironing board on our patio, in my car (the projects that I take to work) and last but not least in our storage unit. I can honestly say I am impressed everytime I think about what I want and I know just where it all is. When we first moved into this place in Feb I had everything packed into Madalynn's closet. Lol, it lasted in that closet I think two weeks before it got strewn across the house. I am grateful for a husband who seems to be ok with things spreading themselves out. It is insane.

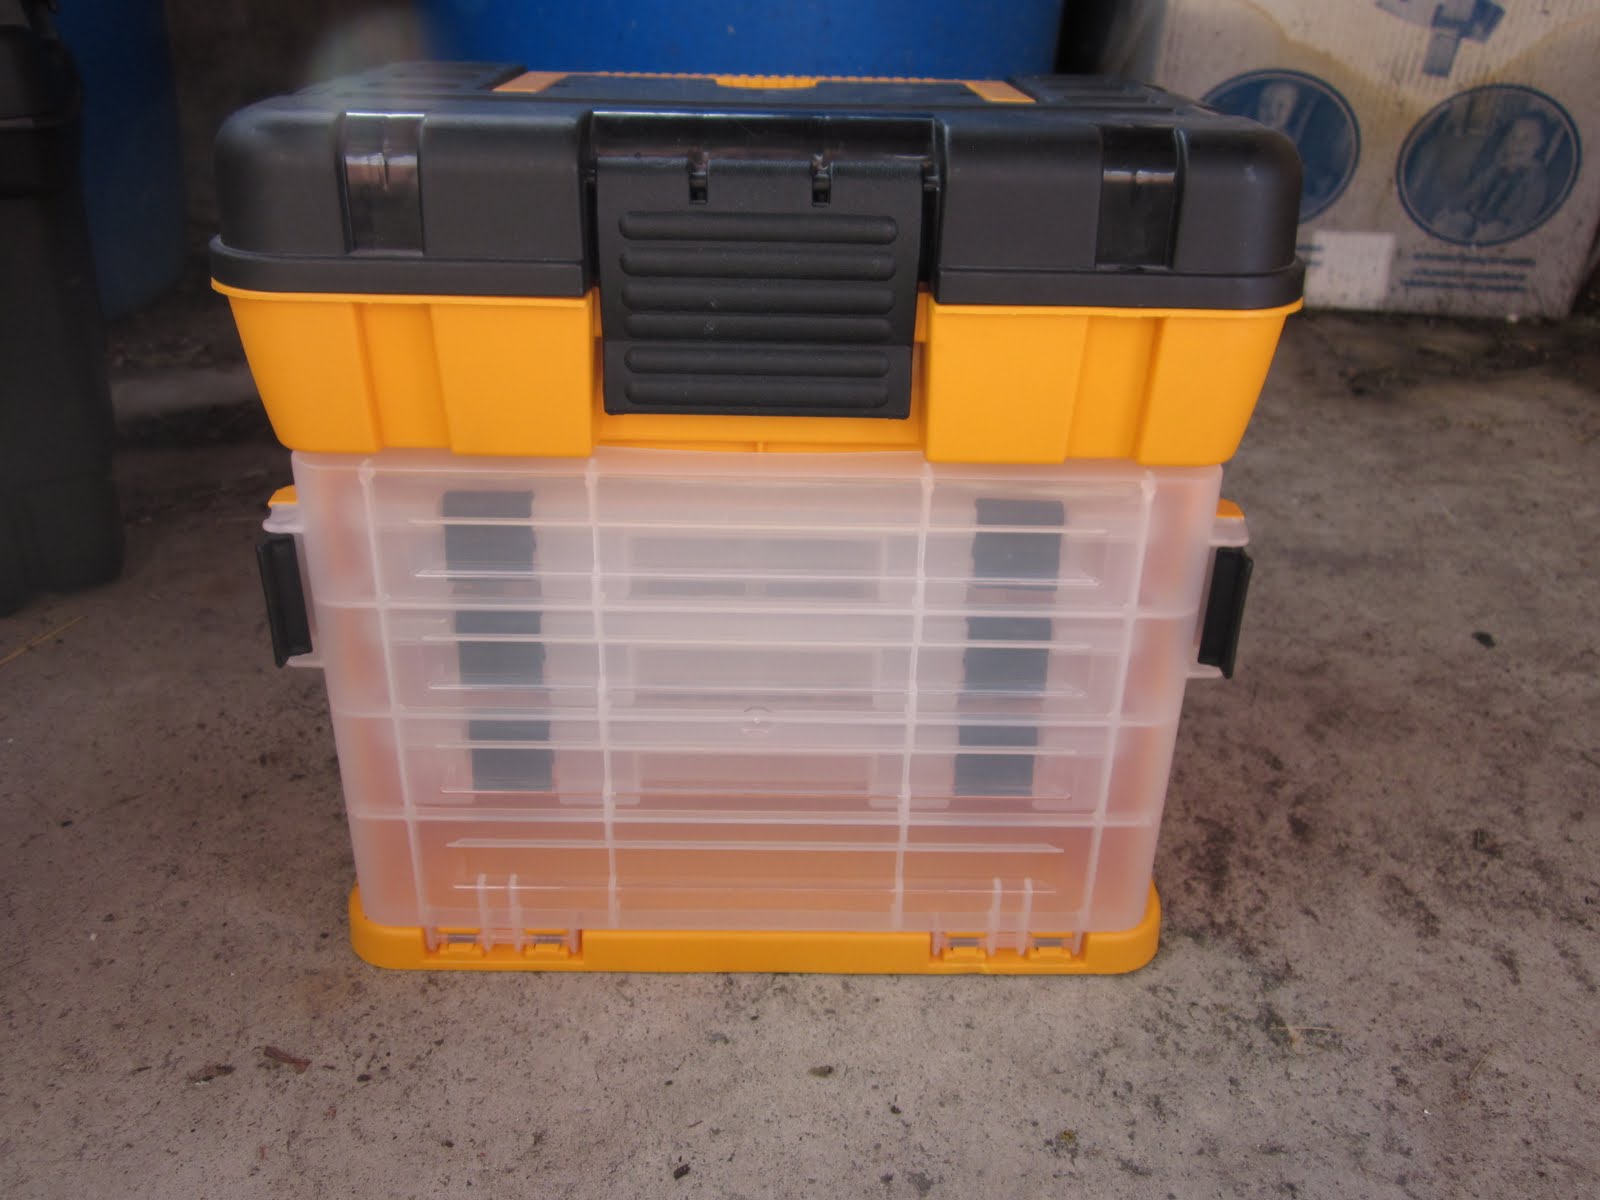
 It was my tool box and small supply box. It is a Christmas decorations storage box. I love the tray. It fit all of my scissors and little stuff great. However, I started to not be able to handle the fact that the lid would pop off because it didn't lock into place and I only had most of my tools in the top because they would not all fit. So I would just carry around what I needed for just that specific project and nothing else. So I started looking for a new tool box.
I bought the following tool box at home depot. It was on clearance at the time and only cost $6. I thought that that was a great price for a tool box. When I was looking for this box I decided that I needed something with:
1. A tray
2. Locking lid with a place for an actual lock so I could keep my daughter out.
3. Area's that were separate for my notions and my projects and preferably removable.
4. Sturdy but not too big or heavy
 I have a small opening for my needles, chap stick, and other small square items.
 I love my tray. I have all my necessities on this tray.
 And...the space inside the tool box is just perfect..big but not too big that I can't fit it on the front seat of my car for on-the-go crafting or too heavy when it is full that I can't pick it up.
 As part of my post I thought I would make a list of the items that I keep in my tool box. I do pull them out to use, but every night when I am finished working I try to take 5 minutes and put everything back where it goes. Here is my tool box at a glance:
Scissors: my two pair of nice ones, a pair of paper ones, rag quilt scissors, rotary cutter and replacement blades
all my bobbins,
all my sewing machine feet,
pencil, pen, fabric marking pen, chap stick pad of paper,
all my needles (hand stitching, machine needles),
my two small acrylic square rulers, hemming ruler,
my 505, my quilting gloves,
two boxes of pins, my magnetic pin holder,
white thread, elastic thread, invisible thread,
my sewing machine oil and other cleaning supplies,
my clover binding makers, magnetic snaps for making purses,
thread wax, seam ripper, measuring tape,
my gypsy (cricut designing tool) and it's power/charging cord,
projects that I am finishing,
lint brush, safety pins,
click and stick scrapbook adhesive, scotch tape,
crochet hook
bandades (for when i cut myself with my scissors :( or poke myself with a needle)
elastic, steam a seam 2
a lighter and fray check for finishing items
paint brushes and sponges
various keys (to things that I am not going to mention :) haha)
and magnets.
The only item that I wish fit in my tool box that doesn't is my acrylic cutter ruler. It would be nice if it fit, but it is ok that it doesn't.
Now, I know that everyone has their own style and way of organizing things. I probably wouldnt' have a tool box if I didn't craft on-the-go. However, most of my craft days during the summer are spent at a friends house, my in-laws cabin or simply moving rooms in my house to be with my daughter and watching her, but crafting at the same time. I would suggest to all that are looking for a tool box...don't buy the ones in the crafting stores. They are just sooooo expensive. While it is true that is the only place you can buy ones that are 12" by 12" and there are some great sales on those, find a hardware store to buy your toolboxes.
I bought these at Harbor Freight for $4.50.

 I have two of these and use them for my buttons and scrapbooking brads, eyelets and other small items. After buying this tool box I saw the exact same one a year later at Archiver's for almost $20. Sure the ones at Archiver's put out by Creative Options are a cute green and purple, they were exactly the same in size and function. Just do your research on what you think is the best for what you need to store and then go and buy. Check Craigslist, KSL or whatever your local online used market is first. It pays off to be patient and find what you want.
Hope that you enjoyed.
Over time I have bought clear boxes to put everything in. It just makes it easier to find things. Right now I have craft stuff in my daughter's closet, the coat closet, the kitchen, on our storage racks in the kitchen, in a filing cabinet, piled on the filing cabinet, on top of the deep freezer (that is my ironing board), stashed in a corner behind our deep freezer, on my old ironing board on our patio, in my car (the projects that I take to work) and last but not least in our storage unit. I can honestly say I am impressed everytime I think about what I want and I know just where it all is. When we first moved into this place in Feb I had everything packed into Madalynn's closet. Lol, it lasted in that closet I think two weeks before it got strewn across the house. I am grateful for a husband who seems to be ok with things spreading themselves out. It is insane.
So, last year I was carrying around this box.

 It was my tool box and small supply box. It is a Christmas decorations storage box. I love the tray. It fit all of my scissors and little stuff great. However, I started to not be able to handle the fact that the lid would pop off because it didn't lock into place and I only had most of my tools in the top because they would not all fit. So I would just carry around what I needed for just that specific project and nothing else. So I started looking for a new tool box.
I bought the following tool box at home depot. It was on clearance at the time and only cost $6. I thought that that was a great price for a tool box. When I was looking for this box I decided that I needed something with:
1. A tray
2. Locking lid with a place for an actual lock so I could keep my daughter out.
3. Area's that were separate for my notions and my projects and preferably removable.
4. Sturdy but not too big or heavy
I love this tool box.

 I have all my bobbins in a removable container on the top that I can either simply open or remove. While it does not have specific slots for bobbins, I just tape the ends of my bobbins so the thread does not unravel and it works great.

 I have another removable container for all the other notions that I use for projects and simply never know when I am going to need them.

 I have all my bobbins in a removable container on the top that I can either simply open or remove. While it does not have specific slots for bobbins, I just tape the ends of my bobbins so the thread does not unravel and it works great.
 I have another removable container for all the other notions that I use for projects and simply never know when I am going to need them.
 I have a small opening for my needles, chap stick, and other small square items.
 I love my tray. I have all my necessities on this tray.
 And...the space inside the tool box is just perfect..big but not too big that I can't fit it on the front seat of my car for on-the-go crafting or too heavy when it is full that I can't pick it up.
 As part of my post I thought I would make a list of the items that I keep in my tool box. I do pull them out to use, but every night when I am finished working I try to take 5 minutes and put everything back where it goes. Here is my tool box at a glance:
Scissors: my two pair of nice ones, a pair of paper ones, rag quilt scissors, rotary cutter and replacement blades
all my bobbins,
all my sewing machine feet,
pencil, pen, fabric marking pen, chap stick pad of paper,
all my needles (hand stitching, machine needles),
my two small acrylic square rulers, hemming ruler,
my 505, my quilting gloves,
two boxes of pins, my magnetic pin holder,
white thread, elastic thread, invisible thread,
my sewing machine oil and other cleaning supplies,
my clover binding makers, magnetic snaps for making purses,
thread wax, seam ripper, measuring tape,
my gypsy (cricut designing tool) and it's power/charging cord,
projects that I am finishing,
lint brush, safety pins,
click and stick scrapbook adhesive, scotch tape,
crochet hook
bandades (for when i cut myself with my scissors :( or poke myself with a needle)
elastic, steam a seam 2
a lighter and fray check for finishing items
paint brushes and sponges
various keys (to things that I am not going to mention :) haha)
and magnets.
The only item that I wish fit in my tool box that doesn't is my acrylic cutter ruler. It would be nice if it fit, but it is ok that it doesn't.
Now, I know that everyone has their own style and way of organizing things. I probably wouldnt' have a tool box if I didn't craft on-the-go. However, most of my craft days during the summer are spent at a friends house, my in-laws cabin or simply moving rooms in my house to be with my daughter and watching her, but crafting at the same time. I would suggest to all that are looking for a tool box...don't buy the ones in the crafting stores. They are just sooooo expensive. While it is true that is the only place you can buy ones that are 12" by 12" and there are some great sales on those, find a hardware store to buy your toolboxes.
I bought these at Harbor Freight for $4.50.
 I have two of these and use them for my buttons and scrapbooking brads, eyelets and other small items. After buying this tool box I saw the exact same one a year later at Archiver's for almost $20. Sure the ones at Archiver's put out by Creative Options are a cute green and purple, they were exactly the same in size and function. Just do your research on what you think is the best for what you need to store and then go and buy. Check Craigslist, KSL or whatever your local online used market is first. It pays off to be patient and find what you want.
Hope that you enjoyed.
Thursday, July 7, 2011
Can't live without it- part 5
Every quilter needs an acrylic ruler. They vary in size and dimension, but inevitably you will buy one. Welll...maybe not. My mom used a angle arm used for construction or a yard stick. They work, they are cheap, but I simply can't live without my ruler.
So I am going to list things that people use with their rulers to cut and measure fabric and then I am going to post my seriously amazing ruler. Once you have a ruler you will want a rotary cutter. Scissors work fine, but man a rotary cutter just saves soooooooooooo much time. Many people buy one of those hand grips to keep the ruler in place so it doesn't slip on the ruler. Many people buy several sized rulers for various projects. I can honestly say that I do have two other rulers besides this one but this is I think the best size for having just one if you want just one.
Here is my Fiskars 6 1/2" by 24" cutter/ruler
 The things that I like about my ruler are
1. It has a rotary cutter attached.
2. It used the same size blade as most rotary cutters
3. The edge with the cutter attached is heavy, unbending and easy to grab
4. The size.
Because of the heavy and easy to grab side I would never need a hand grabbing attachment. It makes it so it won't bend. I have seen people brake their acrylic rulers just because it bent too much. I don't have to carry around my rotary cutter with me, just my ruler which is really nice.
ya, I simply can't live without it. I bought it at Walmart in the craft section. I have not seen it anywhere else..ie JoAnn's, Michaels, Hobby Lobby, Robert's Arts and Crafts... I looked every where for one when i was looking for it. My friend introduced me to hers about 4 years ago and I knew that that was the ruler for me. The first few times that I used it, there was a sticky pad on the bottom part of the cutting side that is no longer sticky but made it even more firm at the time. After doing a quick internet search I couldn't find it anywhere. Hm..when I find a link to somewhere you can buy it, I will post a link.
Besides this ruler I also have two other acrylic rulers- a 6 1/2" square and a 2 1/2" square. I bought those because I make a lot of small block things and it is nice to just have a square esp. the smallest one. I am currently considering buying a circle acrylic set for my newest projects and that would be more of a template ruler than an everyday functioning ruler.
Well hope that you enjoyed my ramblings on one of my favorite tools.
Monday, July 4, 2011
Can't live without it- part 4
One day in the mail I received a promotional video for a club that sent out quilting videos every month. I watched the video and liked it, but I don't have time to spend on a club like that anymore. That is when I really learned about English paper piecing. It was a great video and the had a segment that inspired me to make my English Paper piecing 4th of July quilt. English paper piecing is sooooo easy! Anyways, so as I was watching her she used this thread wax thing to make her thread easier to use.
I immediately went over to the computer to research the exact wax line that she mentioned and couldn't find it anywhere online. However, on JoAnn's website I found this beeswax thread waxer. I researched beeswax a little bit more and lots of blogs had mentioned it in their English Paper Piecing posts. So $3.50 later I had the following!
 I can't live without it now! I wax all my thread whenever I am just sewing on a button, or whip stitching a binding, or esp. on cross stitch or English paper piecing. The thread just slides through whatever you are trying to sew wish such ease! If you have ever got one of those annoying knots in your thread while you are trying to hand sew something you know that you can get frustrated really easily trying to get it out. I started using my beeswax back in Feb and since then I think that I have had one, only one knot in my thread and that was because it got tangled up while my daughter was grabbing my project. It is a time saver and stress reliever. I keep it in my purse with me for while I am working at work and am considering buying two more just to have one permanently in my tool box and one on my work table at all times. Buying the one at JoAnn's, they have refills that are cheaper than the original purchase with the case and that makes it even cheaper for further use.
Hope that you enjoyed.
Can't live without it- part 3
Today I am posting about the only addition that I have added to my sewing maching....but the most money saving addition I could have made. I have a little bit older basic Bernina machine. When I first started quilting and realized how much money it costs to have a long arm quilter work on my quilts I started asking friends about how they quilted their quilts and researching on the internet how to quilt on my own machine. (I think that it was around that time that I started making small wall hangings because i knew that I could sew those myself at home and that I would be able to quilt them myself too, even if I had to do it by hand.)
If you are going to do any of your own quilting you really need a darning foot. Here is a picture of my machine. I did not think that my basic machine would be able to quilt..but sure enough it can. Sorry for some reason I could not get a non-blurry picture and after about fifty tries this the best I could do today.
 Different view
My foot cost about $40. It was about twice the cost of a foot for newer and more expensive model machines, but totally worth the one time cost. I have probably saved myself in the last month alone around $200 of what I would have paid a long arm quilter to quilt for me.
I did a lot of research about how to quilt on your own machine..on the internet, reading books from the library, asking workers in various quilting stores and just trying things out on my own machine. Seriously it is one of the easiest things in the world to do on my own machine. The only thing that would make it better is if I had a table where my machine sat down inside the table or if I had a long extension on my arm to keep the quilt a little flatter. Right now I am using game boxes placed around my machine, but eventually my husband says he can make me an arm extension...maybe that is what I will ask for for my 30th birthday this year...hm...
Well to close up i thought that I would add a couple link to posts I found on machine quilting. You can youtube machine quilting and get some great videos too. It is awesome.
Crazy Mom Quilts.
The free motion quilting project blog.
Hope that you enjoyed.
Sunday, July 3, 2011
Can't live without it- part 2
Last night I was sewing and thinking about the project I was making. While I was trying to sew and still be in the same room with my daughter yesterday, I moved my sewing machine to the living room on our card table. Of course I missed the space of using our kitchen table where everything can be laid out and also the stability of the kitchen table. The sewing machine would vibrate the card table and so Madalynn thought that she could also shake the table. My machine almost fell over on me. Then she was fascinated with the foot pedal and I had to turn of the machine for almost an hour while she played with it. Ah...I love my little curious 14 month old daughter. She is a lot of fun.
When Russ got home I was just ready to lay out my project and sew the whole top together. So, I moved back into the kitchen and got started. As I was thinking about the whole process from cutting to sewing to finishing the top I realized that I really can't live without my cutting mat. It is a full size table mat. When I was using my cutting mat that is small enough to travel with I was not ever as perfect with my cuts as I am when I can just lay the whole thing out on a big mat to cut. When i am going to friends houses or my in-laws cabin I only ever take projects that are already cut or only use small portions of fabric so I can handle using my small mat.
Unfortunately when I first bought it two and half years ago it was on a folding table just a little too small for it and so it has a couple breaks. It also incurred some damage in our many moves, but really it is heaven. I can't wait until someday when I have a permanent craft room that I can attach it to a table that is the perfect size and never have to move it again. When I was cutting used jeans for a project I could lay the entire pair of jeans on the table and just walk around the table to work on it. On a small cutting mat you constantly have to be moving an shifting everything to get it placed to measure and cut.
I put all my projects on it. I use a lint brush to clean it every day. It is my guide for everything that I measure because it is a ruler just handy and out in the house. I bought it at JoAnn's for like $15 dollars on a sale. I think that it is usually around $70. So, if you are in the need for a big mat, just wait until around Thanksgiving or Christmas. It was on sale then and it was cheaper than the omingrid or friskars cutting mats. Here is a picture. It is cluttered with my current three projects but I don't think that removing everything to take a picture would show the justice of its use. The mat is 58" by 33". Hope that you enjoyed.
When Russ got home I was just ready to lay out my project and sew the whole top together. So, I moved back into the kitchen and got started. As I was thinking about the whole process from cutting to sewing to finishing the top I realized that I really can't live without my cutting mat. It is a full size table mat. When I was using my cutting mat that is small enough to travel with I was not ever as perfect with my cuts as I am when I can just lay the whole thing out on a big mat to cut. When i am going to friends houses or my in-laws cabin I only ever take projects that are already cut or only use small portions of fabric so I can handle using my small mat.
Unfortunately when I first bought it two and half years ago it was on a folding table just a little too small for it and so it has a couple breaks. It also incurred some damage in our many moves, but really it is heaven. I can't wait until someday when I have a permanent craft room that I can attach it to a table that is the perfect size and never have to move it again. When I was cutting used jeans for a project I could lay the entire pair of jeans on the table and just walk around the table to work on it. On a small cutting mat you constantly have to be moving an shifting everything to get it placed to measure and cut.
I put all my projects on it. I use a lint brush to clean it every day. It is my guide for everything that I measure because it is a ruler just handy and out in the house. I bought it at JoAnn's for like $15 dollars on a sale. I think that it is usually around $70. So, if you are in the need for a big mat, just wait until around Thanksgiving or Christmas. It was on sale then and it was cheaper than the omingrid or friskars cutting mats. Here is a picture. It is cluttered with my current three projects but I don't think that removing everything to take a picture would show the justice of its use. The mat is 58" by 33".
 Hope that you enjoyed.
Saturday, July 2, 2011
Can't live without it- part 1
Today I am going to start my "Can't live without it" tool posts. I thought it would be fun to keep track of all the stuff that I cart around with me in my tool box as I take my stuff to sew at friends homes or on trips.
There is no particular order to these posts. Crafting stuff is like a toy to me. I get so excited when I get new things. Out of all the things in my tool box this last week, besides scissors and thread and such, I used these the most.
Today's post is the following: Can you believe what those are for? I bought them at Home Depot. To quilt on your own machine it is so helpful to have gloves with grip. My hands never cramp up from trying to hold onto a big quilt to push it through the machine. I have so much more control over where my hands are moving. You can buy these at fabric or crafting stores. Fons and Porter brand has differing sized gloves that I have seen in most stores but they run about $3 a pair (which seriously is not that bad). But compared to $1 that I spent at Home Depot it is too expensive. I buy all my tool boxes and any tool I can at a hardware store because they mark up everything sooooo expensive in fabric and crafting stores for the SAME THING!
Well I hope that these posts are short and sweet. Hope that you enjoyed.
There is no particular order to these posts. Crafting stuff is like a toy to me. I get so excited when I get new things. Out of all the things in my tool box this last week, besides scissors and thread and such, I used these the most.
Today's post is the following:
 Can you believe what those are for? I bought them at Home Depot. To quilt on your own machine it is so helpful to have gloves with grip. My hands never cramp up from trying to hold onto a big quilt to push it through the machine. I have so much more control over where my hands are moving. You can buy these at fabric or crafting stores. Fons and Porter brand has differing sized gloves that I have seen in most stores but they run about $3 a pair (which seriously is not that bad). But compared to $1 that I spent at Home Depot it is too expensive. I buy all my tool boxes and any tool I can at a hardware store because they mark up everything sooooo expensive in fabric and crafting stores for the SAME THING!
Well I hope that these posts are short and sweet. Hope that you enjoyed.
Sunday, September 5, 2010
My new toy!!!
So, while the baby took an incredibly long nap the other day I did some surfing on the internet. I know that that is not the greatest use of time. I really thought that i she was going to wake up so that I could run some errands. Two and a half hours later, she finally woke up and I had discovered a new toy that I went and bought for myself for my birthday this week. I love making bindings that match the project that I am working on. Since I first learned how, I have always made my own and not used a store bought one. (well, with the exception of the binding I used on the car seat because I wanted a bright solid color and buying a pre-made one was a lot cheaper) Well, as anyone who knows me can tell you...i am a super accident prone person. So would it surprise anyone that when i use an iron I am constantly getting burned? Probably not.
When I use an iron to make my bindings I either get my fingers too close to the tip of the iron while I am holding over the side it am ironing in half, or the steam gets going and my hand just gets to close to it. I have decided since I make a living using my hands to play the piano that I need to find a different way of making bindings. Well, I saw Simplicity's Bias Take Maker Machine in Nancy's Notions catalog that i get in the mail. I went online to find out more about it. It is the most awesome machine. I watched several videos on YouTube about how to use it and how wonderful it is. However, after doing a search on the cost of the machine I decided that I might want to wait and see what else I could find. I simply am not going to spend $50-100 just for a machine.
Well, nancy of nancy's notions did a demonstration of a small Bias Tape Maker. After I saw this video I went staight to JoAnns's website and found a 1" Bias Tape Maker. The link will show you what I was looking at and it is on sale right now for 40% online. However, i decided to go look at it in the store. Dritz had one that was 1", cheaper and I bought it. It was on sale for 50% off for labor day weekend. Bonus!!!! This is going to be perfect. No more burning my fingers!!!! So I was reading some reviews online and found a blog called Craft Critique.com. Awesome!!! I will be checking this site more often for all the things that I want to know more about. I can't wait to show you all the things that I am going to make with this new gadget. I am going to be using to finish the bindings for my latest project that I really hope to finish this week.
Subscribe to:
Posts (Atom)